Nauticam HSS TTL Converter for Nikon (NA-Z8/Z9/Z6III)
USER MANUAL
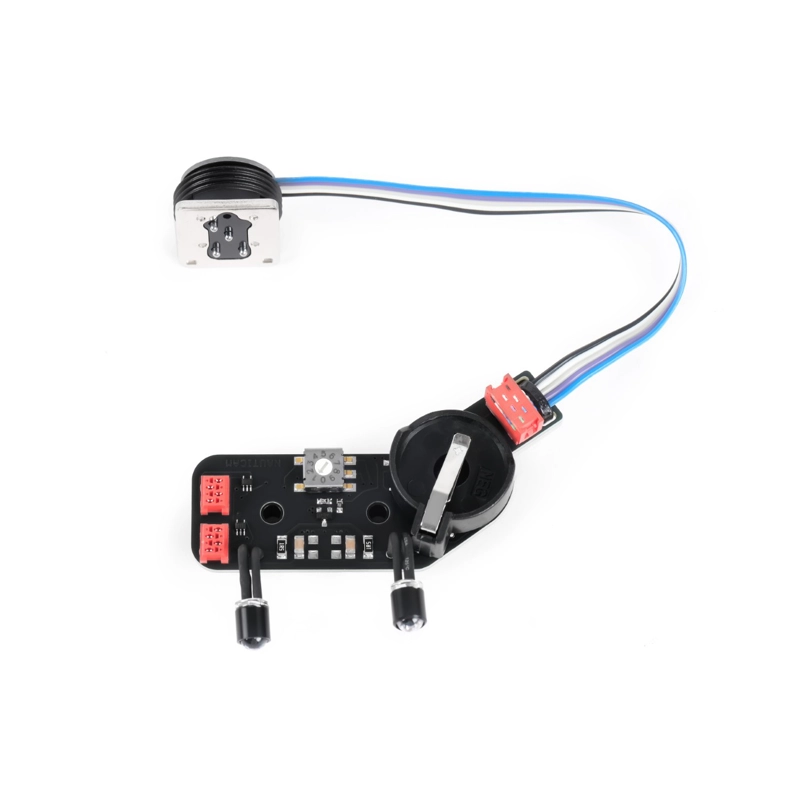
20250805/001.webp)
Specifications
Feature | Details |
|---|---|
Compatible photo cameras: | Nikon |
Compatible underwater housings: | Nauticam |
Compatible TTL strobes: | <ul><li>Inon Z240, Z330, S220, D200</li><li>Sea&Sea YS-D3 Mark II, YS-D3-DUO, YS-D1, YS-250</li><li>Ikelite DS-232, DS-230, DS-162, DS-161, DS-160, DS-125</li><li>Retra Pro MAX (including HSS functionality)</li><li>Subtronic Pro 270, Pro 160</li><li>Marelux APOLLO-III V2.0, APOLLO-S (including HSS functionality)</li></ul> |
TTL outputs onboard: | 2 optical + 2 electrical |
HSS (High Speed Synchronization) support: | manual type HSS with Retra and Apollo strobes, - up to 1/8000s |
Flash settings control by camera menu: | yes |
Rear / Front Curtain synchronization support: | yes |
Continuous shooting mode (CL / CH) support: | yes |
Switching "TTL / M" underwater: | yes |
(+/-) "Flash Exposure compensation" support: | yes |
Switching power "ON/OFF": | automatic by camera command |
Battery type: | CR2032 (2pcs.) |
Current consumption (in standby mode): | 0.01 mkA |
Battery capacity (+20°C): | 65,000 flashes, 1 year in standby mode |
Fiber-optical cable type: | 613 cores only Nauticam 26216 / 26217 |
Compatible Electric Bulkheads (optional): | UWTechnics electric M14 bulkheads (Nikonos, Ikelite style) |
Electric Sync Cord support (Sea&Sea, Ikelite): | yes |
Dual Electric Sync Cord support (Sea&Sea, Ikelite): | yes |
Safety Warning for Batteries Usage
- Use only batteries of the type specified in the Specification.
- Batteries must be new and undamaged. Carefully check batteries before usage.
- To avoid leakage or explosion, always check appropriate battery terminals position ("plus" terminal up) before installing to the TTL Converter.
- Never expose batteries to overheating, short-circuiting, disassembling, high pressure, or mechanical deformation. Save batteries from high humidity and water. All these circumstances may cause a chemical leakage, electric shock, explosion or fire, which can be dangerous for health.
- Remove batteries from TTL Converter before long-time storage.
- Utilize used batteries according to appropriate rules.
- Keep out batteries of children. Save batteries in an inaccessible place for children.
External Cable Connections for Underwater Strobes
The TTL-Converter maintains synchronization for underwater strobes by Fiber Optical cable connection and by electric cable connection as well. Fiber optical cables can be connected via 2 optical sockets on the housing.
The 613-core fiber optical cable type is strongly recommended for usage with TTL Converter to achieve an accurate automatic TTL flash control. Other fiber cables have a lower "transmission index" and give a worse exposure.
Optional Accessories Compatible with Nauticam Housing
- Nauticam #25019 Stepdown Adapter M16-to-M14
- Nauticam #25097 Stepdown Adapter M24-to-M14
Bulkheads and adapters are optional products and must be purchased separately.
20250805/002.webp)
Installation
- Unscrew 2 bolts and remove the Nauticam mirror prism (if it exists) from the housing.
- Insert 2 batteries CR2032 into the TTL-Converter battery holder. Before installation, check that the "Plus" terminal of each battery is in the Up position.
- Optional: For electric sync cords, connect the installed electric bulkheads to the 4-pin MicroMatch sockets on the TTL board.
- Install the TTL-Converter to its place, simultaneously inserting both LEDs into the optical bulkheads. Bend the LED's wires to the necessary shape during the installation.
- Screw in the 2 bolts M3x8mm included with the TTL Converter package.
IMPORTANT! Push both LEDs as deep as possible into the optical bulkheads. The LED must be inserted very close to the transparent optical element inside the bulkhead to get normal TTL accuracy.
Setting the Strobe Type
Set the TTL-Converter rotary switch according to your strobe type:
- 0 - Manual Mode (TTL protocol is disabled)
- 1 - Inon Z240, D200, Sea&Sea YS-D1
- 2 - Sea&Sea YS-D3-DUO
- 3 - Sea&Sea YS-D3 Mark II
- 4 - Ikelite DS-232, DS-230, Sea&Sea YS-250, Subtronic Pro 270 (by electric sync cord)
- 5 - Ikelite DS-162, DS-161, DS-160, DS-125 (by electric sync cord)
- 6 - Inon Z330
- 7 - Retra Pro MAX
- 8 - Subtronic Pro 160 (by electric sync cord)
- 9 - Inon S220
Initial Settings
Battery Energy Saving
IMPORTANT! Set an acceptable small "Standby Timer" (or "Power Off Delay") in the camera menu. This is important for TTL Converter battery saving. A time of 4 to 10 seconds is strongly recommended.
20250805/003.webp)
Setup Steps
- Set the TTL Converter rotary switch to a position from 1-9 according to your strobe type.
- Insert the Hot Shoe plug into the camera socket until it stops.
- Switch ON the camera.
If the TTL Converter works properly, the camera will recognize a compatible TTL device and confirm it by showing the "Flash" symbol on the screen. If the "Flash" symbol does not appear, it means the communication protocol is not working.
Shooting in TTL Flash Mode
- Exposure Metering: Set the appropriate "Exposure Metering Type" (Matrix, Center-weighted, etc.). For beginners, "Center-weighted metering" is recommended.
20250805/004.webp)
- Flash Sync Mode: Set the "Flash mode" to "Fill Flash" (1st curtain sync). "Rear-curtain sync" is also supported for creative shooting.
- Flash Sync Speed: Set a desired maximum "Flash sync speed" like 1/200s. Do not set any sync speeds marked by "Auto FP" when in TTL mode.
20250805/005.webp)
- Flash Compensation: Set "Flash Compensation" and "Exposure Compensation" to "0 EV" as an initial value. You can adjust this later.
- Camera Mode: Use Manual (M) mode on your camera and set the Aperture and Shutter Speed manually.
- Aperture: Use a range of F8-F16 for Wide-angle and F16-F22 for Macro as a starting point.
- ISO: Use a medium level ISO of 400-800 for wide-angle and ISO 200-400 for macro.
- Strobe Settings: Set your strobe's dial to the appropriate TTL mode (e.g., "S-TTL", "DS-TTL II"). Set the strobe's own +/- EV correction dial to "0".
Make a few test shots on land before diving. If the image is too dark or light, adjust the "Flash Exposure Compensation" in your camera menu.
Shooting in MANUAL Flash Mode
There are two ways to use Manual mode:
1. Via Camera Menu ("Auto FP" command)
20250805/006.webp)
- In the camera's "Flash sync speed" menu, select a speed marked with "Auto FP" (e.g., 1/200s Auto FP). This puts the converter into Manual mode.
- IMPORTANT: "Auto FP" also allows for very fast shutter speeds (HSS). Do not set your shutter speed faster than your camera's standard X-sync speed (e.g., 1/200s or 1/250s) unless you are using an HSS-compatible strobe.
- Adjust flash power using the "Flash Compensation" menu in your camera.
20250805/007.webp)
2. Via Rotary Switch "0" position
- Set the rotary switch on the TTL converter to position "0". This must be done before closing the housing.
- This completely disables all TTL communication.
- Adjust flash power directly on the strobe body itself.
HSS (High Speed Synchronization) with Retra and Apollo Strobes
HSS allows you to shoot at shutter speeds up to 1/8000s. Note that HSS on these strobes is a Manual flash mode only, not TTL.
20250805/008.webp)
- Set the strobe dial knob to the "HSS" position.
- Set the converter to Manual (M) mode via the camera menu (using the "Auto FP" command).
- Test your camera at any HSS speed and adjust the desired flash intensity using the knob on the strobe.
Other Features
Ultra-fast Shutter Speeds for shooting with ambient light (without flash)
The TTL-Converter firmware allows the use of ultra-fast shutter speeds for shooting with ambient sunlight (but without flashing) even if the Hot Shoe plug is connected. These speeds are available in Manual mode (using the "Auto FP" command) up to 1/8000s.
Continuous (Serial) Shooting using underwater strobes
In common case, all underwater strobes support accurate TTL lighting only in Single Shot mode, because the strobe must be fully charged before each flash. For Continuous (Serial) Shooting, it is recommended to use Manual mode and set small flash intensities.
Shooting with flash off
20250805/009.webp)
The photographer can set "Flash OFF" mode by camera menu, or assign an "Fn" button to the "flash off" option on some cameras. Use this option when it is necessary to temporarily switch the flash OFF.
Storage
- After shooting, switch OFF the camera to save battery energy.
- Disconnect the Hot Shoe plug from the camera after diving.
- For long-term storage, remove the batteries from the TTL-Converter.